...because any audio engineering tutorial is better with a Bob Saget pun...
For this tutorial we are going to show you how to take a mediocre, boring, flat, or just plain wretched sounding kick drum, and magically engineer it into a bass-rattling behemoth. "But, why should I bother learning how to make my own kick drums?" you ask...Well, because, the kick drum is the corner-stone of almost all modern recordings. Check out any hip hop, rock, pop or dance track on the radio today. Front-and-center is a big, beefy kick. Since the kick drum has such high energy content, it goes a long way towards producing the perception of BIGNESS and LOUDNESS in a track. Often, you'll have a kick drum in your track that you selected for its character... but then you realize its bass output is no good in the context of the rest of your mix. At any rate, you are unlikely to escape the need to take a kick, and pump it up to the next level at some point during your recording.
These techniques, among other secret recipes, were used in producing many of our kits, such as for our Ultra Massive Drums series.
Allright lets go step-by-step. Here is a truly pitiful sounding kick drum...
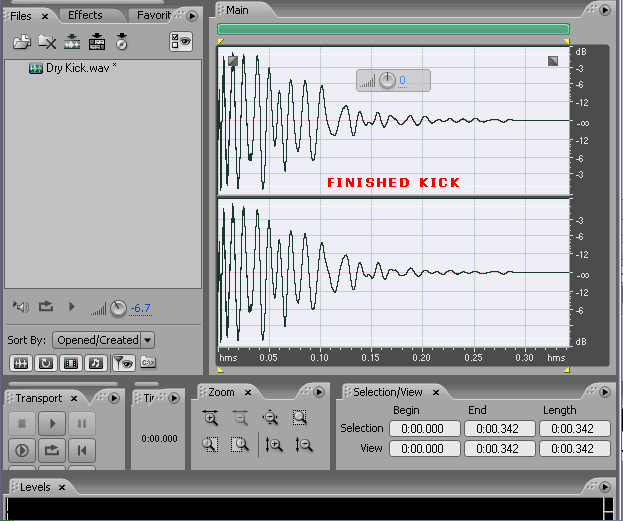
Original Dry Kick:
scroll down to the bottom to hear the final result
...Agreed? Ok, well lets see how we can whip this flabby bastard into a mercilous dancefloor-filler.
Step 1. Stereoize - First, lets turn this into a stereo wav file. That's because later in the game you may want to add a bit of subtle reverb or other effects, and dealing with a stereo image to start with is a good idea (but be warned, when adding effects, try to keep the stereo image NARROW especially in the bass frequencies. That is to say, keep the fundamental bass elements close to the center, or else the kick loses much of its power.)
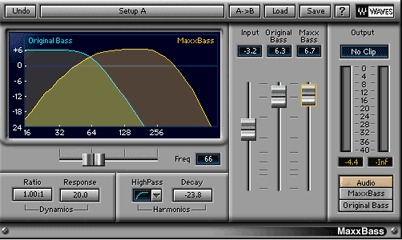
Step 2. Boost the Bass - I'm using Waves MaxxBass for this step [see Figure 2]. Its basically a sub-bass-to-mid-bass synthesizer. It'll calculate what it thinks is the missing harmonic bass frequencies and add them even if they aren't much there to begin with. If you don't have a bass booster plugin like MaxxBass, hopefully you can pump up the bass to an acceptable result during EQ at the next step. The key here is adding just enough bass at around the 50-90hz bandwidth to get the perception of fullness. Don't go overboard or else you'll add a lot of unnecessary rumblage that just ends up taking up too much amplitude without sounding any bigger.
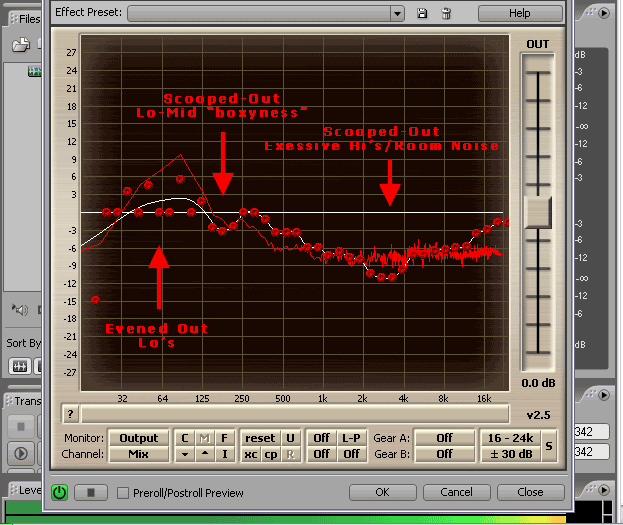
Step 3. The Great Equalizer - This step may seem like a given, but watching the mistakes beginners make during EQ, it bears detailing. What's important here is, again, not going overboard. You'll want to even-out the bass-frequencies, around the 50-120hz area. It should look like a nice fluid hump that peaks, and then rolls down in both directions from the fundamental frequency (usually 70-90hz). Dont even-it-out too much. It should have a decent, discernable peak.
Next, we may want to scoop out the 'boxy' sounding frequences around 130-300hz. If it sounds too 'nasal' or 'boxy' and not 'thuddy' enough, bring it down in this bandwidth range until it sounds more like a stomping thud. You may not want to remove too much in this area if the goal is a higher frequency (say, 100-120hz peaked) techno kick, or garage rock-type kick drum.
For the upper-highs, in this particular case, there is way too much "airy" presence in the kick. We have to scoop out much of the mid-to-high frequencies, beginning at around 1000hz or else it will sound too bright and percussive. Otherwise, if there isn't much high-frequency content to begin with, its best to leave it alone or perhaps nudge up the highs a bit, peaking around 8000hz to 15,000hz to give clarity. But make sure it has a long slope downwards toward the mid frequencies. [see Figure 3]
At this point its a good idea to compress the kick if it looks like a spikey mess. However, if all of the peaks are fairly uniform and gradual, such as in our kick, then you won't need to compress it at all. If you do use a compressor, make sure the attack is in the range of 30-60 to preserve punchiness.
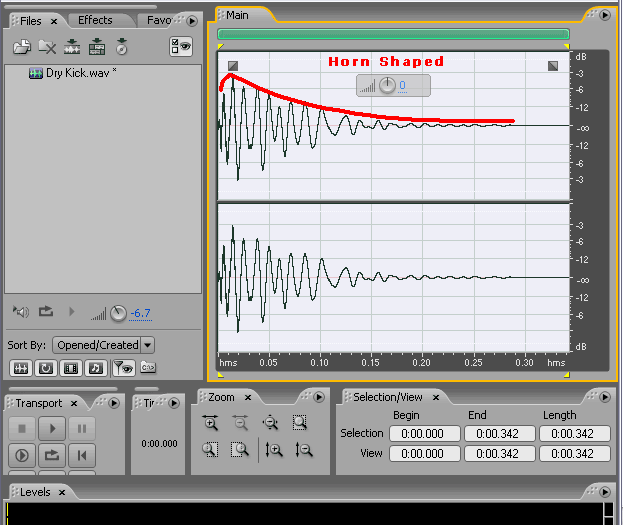
Step 4. Envelope Amplitude Adjustment - Ok, our kick sounds pretty decent now, but it probably needs a bit of level adjustment. Its best to keep in mind that most kick drums follow a similar basic percussive adsr envelope - that is, the curvature of the waveform from the front to end should resemble a horn. What we'll try to do is producer this horn-shaped waveform manually [see Figure 4]. You can try to guestimate it by drawing an envelope yourself, or you can manually decrease the amplitude of each cycle until it resembles the final product you had in mind. Be sure to actually listen to your results here. A good looking horn-shaped kick doesn't necessarily mean it will sound the way you are intending. A good rule of thumb here is to preserve as much of a tail-end as possible to keep the length of the kick, rather than trim it down to a quick-sounding "pop". Besides, you can always decrease the release-tail (shorten the kick) in your drum-machine anyways, but you can't easily do the opposite (lengthen the kick). As for the beginning of the kick, this is the part that gives attack to the drum. If the attack slopes upwards, it will sound soft, and likely a bit weak. To make it a bit more punchy, highlight the first few cycles in the kick and amplify it to maybe a few db's below the uppermost peak (loudest point) of the waveform.
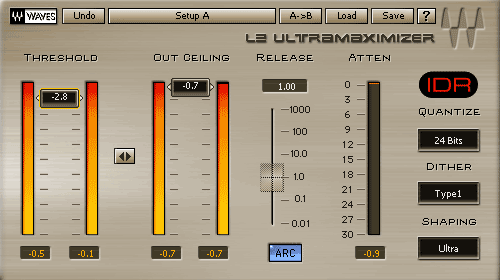
Step 5. Maximize - Here comes the 'controversial' part: limiting. A lot of old-schoolers will tell you that it's a bad idea to add limiting at any stage before the mastering process. Like a lot of sweeping-statements such as this, it just isn't true.. or isn't true any longer. Now, before this drives you into fits of insanity, losing your moral compass and declarying, "if nothing is true, everything is permitted!" curb the drama and notice that in most popular music the kick drum represents the upper-most peak amplitude of any given track and by maximizing the post-trasient loudness of your kick without resulting in a square waveform you will likely have more headroom before the final mastering stage of your track. Here i've added only about 2-3db of limiting. No need to overdo it at this point because I just wanted to punch up-to-par those initial few peaks... You don't want to end up with a square-shaped waveform, lest you end up on a killing-spree.
There you have it! We took an unworthy kick drum and whipped it into much better shape. These techniques can be used even with kicks that sound good to begin with, but need that little extra something to make them master-ready. At the mixing stage, you may want to experiment with adding minimal room reverb to bring out dimension in the kick as well; usually a tight, close reverb will suffice.
You can download the source material, to try out this tutorial for yourself:
Original Kick, and Final Kick