This tutorial is specific to installing 72-pin RAM (16MB, 32MB, 64MB, 96MB) into samplers such as, MPC3000, MPC2000(XL), Akai S-Series, Korg Triton Series, Yamaha Motif/EX/RS and others. However, many of the principles in performing ram-upgrades in general are covered here. Let's take a look...
If you're looking for RAM for the samplers listed above, check out our store by going here.
First, a caveat about handling RAM. RAM sticks should be transported in anti-static bags/coverings to protect them from static electricity. Similarly, when removing the sticks from their package and installing, proper precautions should be taken to ensure that the chips don't get damaged. You should aim to:
Step 1. Identify The Ram Slot - In most cases, the ram slot is distinguished from any other slot on your board. However, some samplers (such as the triton rack) contain other slots that are probably not where you want to install the ram. Consult your manual if you are unsure, or install the ram in the same group of slots that you see other ram installed in (if that is indeed the case). There is no harm in trying out the other slots, if you need to go by trial and error. See Figure 1.
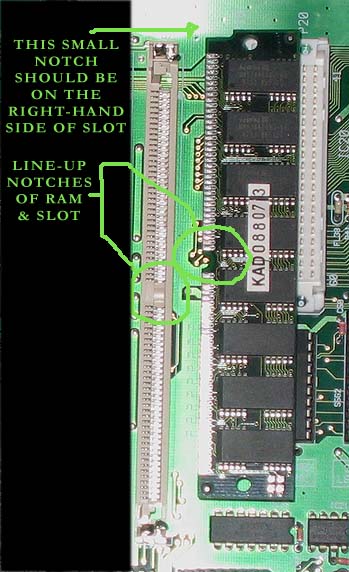
Step 2. Line Up The Notches - Next, with the front of the sampler facing you, flip the RAM stick so that the notch on the side is facing to your right. Then, line up the middle notch with the notch in the RAM slot on your board. See Figure 2.
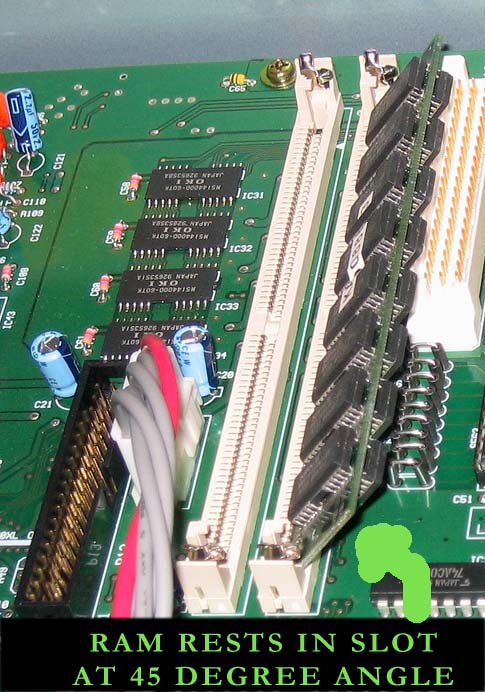
Step 3. Insert The RAM - Insert the RAM in the slot at a 45-degree angle. It should rest at an angle, pointing towards you. See Figure 3.
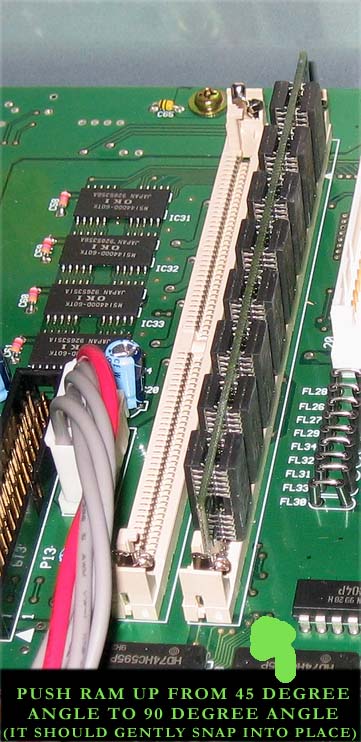
Step 4. Push The RAM Into Place - And, finally, gently push the ram away from you, snapping it into place at a 90-degree angle. You should not have to force it into place too much, or else you have the seating wrong and you need to retrace your steps from the beginning (See Figure 4). Now all you have to do is power on your unit and wait for the message that tells you how much RAM is installed to see if the upgrade was successful. Don't panic if you see half of the amount you were expecting. Akai Samplers, and a few others, report the RAM as "MWORDS". In this case, 1 MWORD is worth 2MB's.
Rare as it may be, it happens that upgrades don't go as planned. Everything from failing RAM slots, to zapped RAM chips, to improperly seated RAM sticks, to mixing old RAM with new RAM can cause issues. If you are sure that you inserted the RAM proplerly, as according our steps above, the next thing to do is find the offending stick/slot. If some RAM is showing as installed, then install each RAM stick one-at-time and power-on with one stick at a time to see if a dud shows up. If each stick installs fine, then you can rule out that the RAM sticks are duds. Next, replicate the process with other slots to see if the slot is a dud. Next, if the RAM is mixed with other RAM, its likely that they don't mix togethor, in which case you should get rid of the old RAM altogethor.